

Table of Contents
- 1. Document Damage Immediately with Photos and Video
- 2. Contact Your Insurance Company Right Away
- 3. Schedule an Emergency Roof Inspection Within 24 Hours
- 4. Provide Complete Property Information for Accurate Estimates
- 5. Verify the Estimator's Credentials and Experience
- 6. Request Itemized Estimates with Detailed Breakdowns
- 7. Understand Your Coverage Limits and Deductibles
- Frequently Asked Questions (FAQ)
1. Document Damage Immediately with Photos and Video
When a storm hits, your roof takes the brunt of the damage. Hail, wind, and falling debris can compromise your entire roofing system in minutes. The clock starts ticking immediately: you need documentation for your insurance claim, a reliable estimate of repair costs, and a clear action plan. Most property owners don’t know where to start, and delays can cost thousands in additional water damage and structural deterioration.
Getting a fast, accurate storm damage roof estimate isn’t just about speed. It’s about precision. Insurance companies want detailed evidence. Contractors need specific information to give you a quote you can trust. We’ve guided hundreds of homeowners and commercial managers through this process, and we know which steps separate a smooth claim from a frustrating, drawn-out ordeal.
Let’s walk through the seven critical steps to secure a fast, professional storm damage roof estimate.
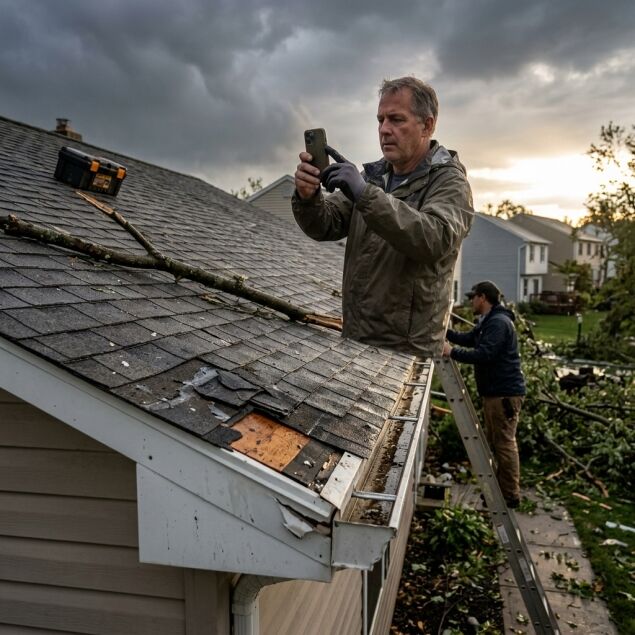
The moment a storm passes, grab your phone and start documenting. Your insurance company will require photographic evidence, and the sooner you have it, the stronger your claim.
Take photos of visible damage from multiple angles and distances. Capture close-ups of dented shingles, cracked tiles, missing flashing, or visible underlayment. Include wide shots showing the overall damage pattern across the roof. If you notice water stains on ceilings or walls inside the house, photograph those too, as they prove active leaks.
Video is equally valuable. Walk around your property slowly, panning across damaged areas and narrating what you see. This creates a continuous record that’s harder to dispute. Include timestamps if your phone automatically records them.
Safety matters here: only access your roof if it’s safe to do so. If steep pitch, unstable sections, or remaining debris create hazards, document from the ground or from a safe vantage point. We recommend staying off the roof entirely and letting professionals assess it during the inspection.
Actionable takeaway: Create a dedicated folder on your phone or cloud storage for storm damage photos and videos. Date-stamp them or add notes with the storm date and time. This organized file becomes your evidence trail.
2. Contact Your Insurance Company Right Away
Call your insurance company within 24 to 48 hours of the storm. Don’t delay. Most policies have timeframes for filing claims, and early notification protects you legally and prevents coverage complications.
When you call, provide your policy number, the date of the damage event, and a brief description of what was damaged. Be factual and straightforward. The agent will likely schedule an adjuster to inspect your property and create their own damage assessment. You can also ask about your coverage limits, deductible, and whether they cover emergency tarping or temporary repairs.
Request written confirmation of your claim number and the adjuster’s contact information. This becomes your reference point for all future conversations. Ask whether the insurance company has a list of preferred or approved contractors, but understand that you’re not obligated to use them. You retain the right to hire any qualified contractor.

Insurance companies often move slowly, and that’s why you shouldn’t wait for them to move first. Starting your own assessment process in parallel means you’ll have detailed estimates ready when the adjuster completes their inspection.
Actionable takeaway: Keep your claim number, adjuster’s name, phone number, and email in a notes app or document. Update this contact information as the claim progresses, and record dates of all conversations.
3. Schedule an Emergency Roof Inspection Within 24 Hours
This is where speed and expertise converge. Within 24 hours of the storm, contact a roofing contractor who offers emergency inspections. We provide same-day assessments in Pennsylvania and New Jersey because we understand that every hour counts when weather exposure threatens your property.
A professional roof inspection identifies damage that’s invisible to untrained eyes. Our inspectors assess the full scope: structural damage to decking and trusses, compromised flashing and seals, damaged gutters and downspouts, and secondary damage that water can cause. They also identify temporary measures needed to prevent further deterioration, like emergency tarping.
The inspector should provide you with preliminary findings on-site and a detailed written report within 24 to 48 hours. This report becomes the foundation of your estimate and your insurance claim. It’s far more credible and thorough than documentation you create alone.
Timing matters strategically. If another storm is forecast, getting that inspection and emergency protection in place beforehand prevents compounding damage. If rain is already seeping into your attic, tarping is urgent.
Actionable takeaway: Call today for an emergency inspection. Have your photos, claim number, and property address ready. During the call, confirm the inspection date and ask whether the contractor provides emergency tarping the same day if needed.
4. Provide Complete Property Information for Accurate Estimates
When the inspector arrives, have key information readily available. The property address, age of the roof, roofing material type (asphalt shingles, metal, slate, tile), square footage of the roof, and any prior repairs or replacements all factor into the estimate.
If you have your original building permits, roof warranty documentation, or prior inspection reports, gather those. They show maintenance history and help the estimator understand what kind of roof system is in place. If your property is a historical home or commercial building with specific architectural requirements, mention that upfront.
Provide access to the attic, crawl spaces, or interior areas where water damage might be evident. Hidden damage inside walls or under insulation can significantly change the scope of work and cost. The more transparency you offer, the more accurate the estimate becomes.
Share your insurance documentation with the contractor. They’ll coordinate with your adjuster and ensure the estimate aligns with your coverage. Many contractors, including our team, assist with the claims process and communicate directly with insurance companies on your behalf, which streamlines approvals.
Actionable takeaway: Create a one-page property summary: address, roof age, materials, square footage, prior repairs, and a brief description of the storm damage you observed. Hand this to the inspector; it saves time and ensures nothing gets missed.
5. Verify the Estimator’s Credentials and Experience
Not every contractor who shows up with a clipboard is equally qualified to assess storm damage. Verify credentials before signing any agreement.
Look for contractors licensed and insured in your state. Pennsylvania and New Jersey have licensing requirements for roofing contractors, and your contractor should carry general liability and workers’ compensation insurance. Ask for proof of both.
Experience with insurance claims specifically matters. A contractor who regularly handles storm damage claims knows how adjusters evaluate damage, what documentation insurers require, and how to present estimates in ways that maximize claim approval. Our team has handled hundreds of storm restoration projects and insurance claims, and that expertise directly benefits your timeline and outcome.
Check references and online reviews, but give extra weight to reviews mentioning insurance claims or storm damage. Ask the contractor directly: How many storm damage claims have you handled? Do you communicate with insurance adjusters? Can you provide references from recent insurance claim projects?
Red flags include contractors who ask for payment upfront before inspection, who guarantee a specific insurance payout, or who pressure you to decide immediately. Legitimate contractors understand that property owners need time to review multiple estimates and consult advisors.
Actionable takeaway: Before scheduling, ask the contractor three questions: (1) Are you fully licensed and insured in this state? (2) How many insurance claims have you handled in the past year? (3) Can you provide two references from recent storm damage projects?
6. Request Itemized Estimates with Detailed Breakdowns
A professional estimate is never a single number. It’s a detailed breakdown of labor, materials, and scope of work.
Your estimate should list every component being repaired or replaced: shingles or roofing material, flashing, underlayment, decking repairs, gutters, downspouts, trim work, and labor hours. Separate material costs from labor costs. Identify any temporary measures already completed (like emergency tarping) and whether those costs are included or separate.
If the estimate includes upgrades or optional improvements, clearly label them so you and your insurance company understand what’s essential repair versus what’s optional enhancement. For example, upgrading to our Zero-Regret Roof System might be presented as an add-on option beyond basic repair.
Ask whether the estimate includes debris removal, cleanup, and site restoration. Some contractors add these as line items; others include them in labor costs. Clarity prevents surprises.
Request the estimate in writing, digitally, and printed. You’ll need copies for your insurance company, your own records, and potentially a lawyer if disputes arise. A written estimate also ensures the contractor can’t verbally claim they promised something different.
Actionable takeaway: When you receive an estimate, don’t sign immediately. Review it line by line. Cross-reference material specs with photos and the inspection report. If anything seems unclear, call and ask. A good contractor welcomes questions.
7. Understand Your Coverage Limits and Deductibles
Your insurance policy has built-in limits and costs that directly affect your out-of-pocket expenses. Understanding these prevents sticker shock when the bill arrives.
Your coverage limit is the maximum the insurance company will pay for roof damage. If your roof replacement costs $25,000 but your limit is $20,000, you’re responsible for the $5,000 difference. Your deductible is the amount you pay before insurance kicks in. A $1,000 deductible means the insurance company covers damage costs above $1,000, and you pay the first $1,000.
Some policies have separate deductibles for wind or hail damage, and those can be higher than standard deductibles. Read your policy documents carefully or ask your agent to clarify in writing.
“Actual Cash Value” versus “Replacement Cost Value” also matters. Actual Cash Value policies account for depreciation, so older roofs receive lower payouts. Replacement Cost Value policies cover the full cost of a new roof. If you’re unsure which you have, ask your agent now.
If the estimate exceeds your coverage limit or if your deductible is high, we can discuss financing options with you. Flexible financing makes it feasible to complete the full repair scope rather than doing partial work and hoping other damage doesn’t worsen.
Understanding coverage before you’re in a crisis prevents poor decisions. If you know your limit is $20,000 and repair estimates are $25,000, you can plan for that gap rather than scrambling to find $5,000 after the fact.
Actionable takeaway: Pull up your insurance policy documents and locate three numbers: coverage limit for roof damage, deductible amount, and whether you have Actual Cash Value or Replacement Cost coverage. Write these down and share them with your contractor’s estimate team so they can coordinate with your adjuster.
—
Getting a fast, accurate storm damage roof estimate is entirely manageable when you follow a systematic approach. Start with documentation today, contact insurance within 24 hours, and schedule a professional emergency inspection immediately. We’re here to guide you through the process and ensure every estimate is thorough, professional, and ready for your insurance company.
When you’re ready to move forward, we provide same-day emergency inspections, detailed written estimates, and full insurance claims process support. Our team communicates directly with adjusters, handles emergency tarping to prevent further damage, and guarantees our work with lifetime protection on labor. Contact us today for your storm damage roof assessment. We’ll get you an estimate within 24 hours and help you reclaim your peace of mind.
Frequently Asked Questions (FAQ)
How quickly can we provide an emergency roof inspection after a storm?
We offer emergency roof inspections within 24 hours of your request during storm season. Our goal is to document damage fast so you can file your insurance claim without delay. We understand that time is critical when your roof is compromised, and we prioritize these calls accordingly.
What documentation should we bring when meeting with your estimator?
Bring photos and videos you’ve taken of the damage, your insurance policy details, and any previous roof maintenance records you have on file. We’ll also need your complete property information including the roof’s age, materials, and square footage. Having these items ready helps us deliver a more accurate estimate during our initial assessment.
Does our estimate help with the insurance claim process?
We provide itemized estimates with detailed breakdowns that your insurance company recognizes and accepts. Our estimates include documentation of damage location, scope of work, and material specifications needed for your claim. We also assist with the claims process directly, communicating with your adjuster to ensure nothing is missed.
